Category:Harbor Defenses of Boston


Pages in category "Harbor Defenses of Boston"
The following 31 pages are in this category, out of 31 total.
F
Media in category "Harbor Defenses of Boston"
The following 200 files are in this category, out of 289 total.
(previous page) (next page)-
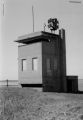
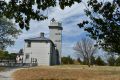
 Emerson Point Fire Control Tower 09.jpg 2,992 × 2,000; 3.84 MB
-
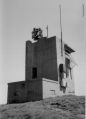
 Emerson Point Fire Control Tower 10.jpg 2,992 × 2,000; 4.21 MB
-
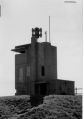
 Emerson Point Fire Control Tower 11.jpg 2,992 × 2,000; 3.78 MB
-
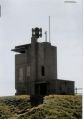
 Emerson Point Fire Control Tower 12.jpg 2,992 × 2,000; 3.81 MB
-
 Emerson Point Fire Control Tower 13.jpg 2,992 × 2,000; 3.69 MB
-
 Emerson Point Fire Control Tower 14.jpg 2,992 × 2,000; 3.36 MB
-
 Emerson Point Fire Control Tower 15.jpg 2,992 × 2,000; 3.88 MB
-
 Emerson Point Fire Control Tower 16.jpg 2,992 × 2,000; 4.08 MB
-
 Emerson Point Fire Control Tower 17.jpg 2,992 × 2,000; 3.72 MB
-
 Emerson Point Fire Control Tower 18.jpg 2,992 × 2,000; 3.98 MB
-
 Emerson Point Fire Control Tower 19.jpg 2,992 × 2,000; 3.81 MB
-
 Emerson Point Fire Control Tower 20.jpg 2,992 × 2,000; 3.86 MB
-
 Emerson Point Fire Control Tower 21.jpg 2,992 × 2,000; 3.85 MB
-
 Emerson Point Fire Control Tower 22.jpg 2,992 × 2,000; 3.68 MB
-
 Emerson Point Fire Control Tower 23.jpg 2,992 × 2,000; 3.53 MB
-
 Emerson Point Fire Control Tower 24.jpg 2,992 × 2,000; 3.84 MB
-
 Emerson Point Fire Control Tower 25.jpg 2,992 × 2,000; 3.53 MB
-
 Emerson Point Fire Control Tower 26.jpg 2,992 × 2,000; 4.22 MB
-
 Emerson Point Fire Control Tower 27.jpg 2,992 × 2,000; 3.99 MB
-
 Emerson Point Fire Control Tower 28.jpg 2,992 × 2,000; 4.11 MB
-
 Emerson Point Fire Control Tower 29.jpg 2,992 × 2,000; 3.08 MB
-
 Emerson Point Fire Control Tower 30.jpg 2,992 × 2,000; 4.32 MB
-
 Emerson Point Fire Control Tower 31.jpg 2,992 × 2,000; 3.89 MB
-
 Emerson Point Levels.jpg 3,520 × 2,720; 3.15 MB
-
 Emerson Point Plan.jpg 2,400 × 3,120; 2.14 MB
-
 Emerson Point RCW2.jpg 3,472 × 2,688; 1.98 MB
-
 Emerson Point Site Plan.jpg 3,440 × 2,656; 2.78 MB
-
 Emerson Point Tower from Roadway.jpg 640 × 424; 283 KB
-
 Emerson Point.jpg 2,784 × 3,408; 1.21 MB
-
 FC Station 1C Form 2 and Plan 1924.jpg 3,304 × 2,553; 1.4 MB
-
 FC Station 1G Form 2 and Plan 1924.jpg 3,304 × 2,553; 1.38 MB
-
 FC Station 1H Form 2 and Plan 1921.jpg 3,304 × 2,553; 1.36 MB
-
 FC Station 1I RCW 1944 2-2.jpg 3,304 × 2,553; 1.16 MB
-
 FCT Emerson Point 01.jpg 2,992 × 2,000; 3.98 MB
-
 FCT Emerson Point 02.jpg 2,992 × 2,000; 4.03 MB
-
 FCT Emerson Point 03.jpg 2,992 × 2,000; 3.61 MB
-
 FCT Emerson Point 04.jpg 2,992 × 2,000; 3.64 MB
-
 FCT Emerson Point 05.jpg 2,992 × 2,000; 3.95 MB
-
 FCT Emerson Point 06.jpg 2,992 × 2,000; 3.41 MB
-
 FCT Emerson Point 07.jpg 2,992 × 2,000; 3.75 MB
-
 FCT Emerson Point 08.jpg 2,992 × 2,000; 3.87 MB
-
 FCT Emerson Point 09.jpg 2,992 × 2,000; 3.52 MB
-
 FCT Emerson Point 10.jpg 2,992 × 2,000; 3.8 MB
-
 FCT Emerson Point 11.jpg 2,992 × 2,000; 3.77 MB
-
 FCT Emerson Point 12.jpg 2,992 × 2,000; 3.76 MB
-
 FCT Emerson Point 13.jpg 2,992 × 2,000; 3.82 MB
-
 FCT Emerson Point 14.jpg 2,992 × 2,000; 3.48 MB
-
 FCT Emerson Point 15.jpg 2,992 × 2,000; 3.8 MB
-
 FCT Emerson Point 16.jpg 2,992 × 2,000; 3.84 MB
-
 FCT Emerson Point 17.jpg 2,992 × 2,000; 3.84 MB
-
 FCT Emerson Point 18.jpg 2,992 × 2,000; 3.97 MB
-
 FCT Emerson Point 19.jpg 2,992 × 2,000; 3.82 MB
-
 FCT Emerson Point 20.jpg 2,992 × 2,000; 3.75 MB
-
 FCT Emerson Point 21.jpg 2,992 × 2,000; 3.89 MB
-
 FCT Emerson Point 22.jpg 2,992 × 2,000; 3.87 MB
-
 FCT Emerson Point 23.jpg 2,992 × 2,000; 3.99 MB
-
 Fort Dawes HECP RCW 1942 2-2.jpg 3,304 × 2,553; 1.11 MB
-
 Fort Heath Combined Station Splinterproofing RCW 1944 2-2.jpg 3,304 × 2,553; 1.35 MB
-
 Fort Independence 01.jpg 6,000 × 4,000; 13.75 MB
-
 Fort Independence 02.jpg 6,000 × 4,000; 13.95 MB
-
 Fort Independence 03.jpg 6,000 × 4,000; 11.61 MB
-
 Fort Independence 04.jpg 6,000 × 4,000; 10.39 MB
-
 Fort Independence 05.jpg 6,000 × 4,000; 13.37 MB
-
 Fort Independence 06.jpg 6,000 × 4,000; 10.33 MB
-
 Fort Independence 07.jpg 6,000 × 4,000; 13.06 MB
-
 Fort Independence 08.jpg 6,000 × 4,000; 13.73 MB
-
 Fort Independence 09.jpg 6,000 × 4,000; 13.75 MB
-
 Fort Independence 10.jpg 6,000 × 4,000; 11.28 MB
-
 Fort Independence 11.jpg 6,000 × 4,000; 11.13 MB
-
 Fort Independence 12.jpg 6,000 × 4,000; 11.57 MB
-
 Fort Independence 13.jpg 6,000 × 4,000; 11.72 MB
-
 Fort Independence 14.jpg 6,000 × 4,000; 14.45 MB
-
 Fort Independence 15.jpg 6,000 × 4,000; 14.14 MB
-
 Fort Independence 155.jpg 6,000 × 4,000; 11.6 MB
-
 Fort Independence 16.jpg 6,000 × 4,000; 15.53 MB
-
 Fort Independence 17.jpg 6,000 × 4,000; 11.51 MB
-
 Fort Independence 18.jpg 6,000 × 4,000; 10.36 MB
-
 Fort Independence 19.jpg 6,000 × 4,000; 12.1 MB
-
 Fort Independence 20.jpg 6,000 × 4,000; 13.02 MB
-
 Fort Independence 21.jpg 6,000 × 4,000; 11.97 MB
-
 Fort Independence 22.jpg 6,000 × 4,000; 11.09 MB
-
 Fort Independence 23.jpg 6,000 × 4,000; 12.81 MB
-
 Fort Independence 24.jpg 6,000 × 4,000; 11.58 MB
-
 Fort Independence 25.jpg 6,000 × 4,000; 10.71 MB
-
 Fort Independence 26.jpg 6,000 × 4,000; 11.08 MB
-
 Fort Independence 27.jpg 6,000 × 4,000; 10.94 MB
-
 Fort Independence 28.jpg 6,000 × 4,000; 11.01 MB
-
 Fort Independence 29.jpg 6,000 × 4,000; 10.52 MB
-
 Fort Independence 30.jpg 6,000 × 4,000; 10.95 MB
-
 Fort Independence 31.jpg 6,000 × 4,000; 11.44 MB
-
 Fort Independence 32.jpg 6,000 × 4,000; 11.92 MB
-
 Fort Independence 33.jpg 5,120 × 3,416; 9.18 MB
-
 Fort Independence 46.jpg 6,000 × 4,000; 11.55 MB
-
 Fort Independence 47.jpg 6,000 × 4,000; 13.58 MB
-
 Fort Independence 48.jpg 6,000 × 4,000; 11.58 MB
-
 Fort Independence 49.jpg 6,000 × 4,000; 11.1 MB
-
 Fort Independence 50.jpg 6,000 × 4,000; 12.3 MB
-
 Fort Independence 51.jpg 6,000 × 4,000; 12.43 MB
-
 Fort Independence 52.jpg 6,000 × 4,000; 11.48 MB
-
 Fort Independence 53.jpg 6,000 × 4,000; 12.03 MB
-
 Fort Independence 54.jpg 6,000 × 4,000; 11.1 MB
-
 Fort Independence 55.jpg 6,000 × 4,000; 11.66 MB
-
 Fort Independence 56.jpg 6,000 × 4,000; 11.08 MB
-
 Fort Independence 57.jpg 6,000 × 4,000; 11.26 MB
-
 Fort Independence 58.jpg 6,000 × 4,000; 11.34 MB
-
 Fort Independence 59.jpg 6,000 × 4,000; 12.01 MB
-
 Fort Independence 60.jpg 6,000 × 4,000; 11.88 MB
-
 Fort Independence 61.jpg 6,000 × 4,000; 11.32 MB
-
 Fort Independence 62.jpg 6,000 × 4,000; 11.17 MB
-
 Fort Independence 63.jpg 6,000 × 4,000; 11.35 MB
-
 Fort Independence 64.jpg 6,000 × 4,000; 11.11 MB
-
 Fort Independence 65.jpg 6,000 × 4,000; 13.03 MB
-
 Fort Independence 66.jpg 6,000 × 4,000; 12.51 MB
-
 Fort Independence 67.jpg 6,000 × 4,000; 11.8 MB
-
 Fort Independence 68.jpg 6,000 × 4,000; 12.11 MB
-
 Fort Independence 69.jpg 6,000 × 4,000; 11.73 MB
-
 Fort Independence 70.jpg 6,000 × 4,000; 11.69 MB
-
 Fort Independence 71.jpg 6,000 × 4,000; 11.42 MB
-
 Fort Independence 72.jpg 6,000 × 4,000; 11.84 MB
-
 Fort Independence 73.jpg 6,000 × 4,000; 12.28 MB
-
 Fort Independence 74.jpg 6,000 × 4,000; 12.08 MB
-
 Fort Independence 75.jpg 6,000 × 4,000; 11.46 MB
-
 Fort Independence 76.jpg 6,000 × 4,000; 11.88 MB
-
 Fort Independence 77.jpg 6,000 × 4,000; 13.9 MB
-
 Fort Independence 78.jpg 6,000 × 4,000; 13.49 MB
-
 Fort Independence 79.jpg 6,000 × 4,000; 13 MB
-
 Fort Independence 80.jpg 6,000 × 4,000; 14.91 MB
-
 Fort Independence 81.jpg 6,000 × 4,000; 11.42 MB
-
 Fort Independence 82.jpg 6,000 × 4,000; 12.65 MB
-
 Fort Independence 83.jpg 6,000 × 4,000; 10.3 MB
-
 Fort Independence 84.jpg 6,000 × 4,000; 11.84 MB
-
 Fort Independence 85.jpg 6,000 × 4,000; 11.41 MB
-
 Fort Independence 86.jpg 6,000 × 4,000; 11.39 MB
-
 Fort Revere M2 Station Splinterproofing RCW 1944 4-4.jpg 3,304 × 2,553; 1.13 MB
-
 Fort Ruckman FC Station 1A RCW 1945 8-7.jpg 3,304 × 2,553; 1.33 MB
-
 Fort Strong Combined Mine Station Form 2 and Plan 1921.jpg 3,304 × 2,553; 1.3 MB
-
 Fort Warren Signal Station to H Station Conversion RCW 1945 3-3.jpg 3,304 × 2,553; 1.2 MB
-
 Fourth Cliff FC Station 1A RCW 1943 2-2.jpg 3,304 × 2,553; 1.22 MB
-
 Fourth Cliff FC Station 1D RCW 1943 2-2.jpg 3,304 × 2,553; 1.13 MB
-
 Great Brewster Mine Station RCW 1945 3-3.jpg 3,304 × 2,553; 1.18 MB
-
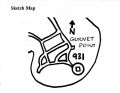
 Gurent Point.jpg 1,300 × 936; 140 KB
-
 Gurnet 1956 Color 01.jpg 796 × 800; 93 KB
-
 Gurnet 1956 Color 03.jpg 648 × 800; 24 KB
-
 Gurnet 1972.jpg 900 × 1,266; 107 KB
-
 Gurnet FCS.jpg 134 × 136; 15 KB
-
 Gurnet Light.jpg 150 × 122; 5 KB
-
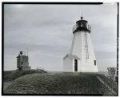
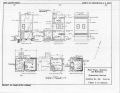 Gurnet Point Elevation Drawings.jpg 3,304 × 2,553; 1.3 MB
-
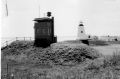 Gurnet Point FCS 01.jpg 1,499 × 986; 411 KB
-
 Gurnet Point FCS 02.jpg 1,284 × 994; 168 KB
-
 Gurnet Point FCS 03.jpg 1,015 × 1,471; 334 KB
-
 Gurnet Point FCS 04.jpg 1,037 × 1,439; 332 KB
-
 Gurnet Point FCS 05.jpg 1,027 × 1,460; 341 KB
-
 Gurnet Point Fire Control Station 01.jpg 1,027 × 1,460; 176 KB
-
 Gurnet Point Fire Control Station 02.jpg 1,499 × 986; 252 KB
-
 Gurnet Point Fire Control Station 03.jpg 1,015 × 1,471; 193 KB
-
 Gurnet Point Fire Control Station 04.jpg 1,037 × 1,439; 181 KB
-
 Gurnet Point Station Location.jpg 1,271 × 536; 119 KB
-
 Halibut FCT (70).jpg 1,151 × 1,758; 253 KB
-
 Halibut Point 1945.jpg 875 × 823; 214 KB
-
 Halibut Point 1980.jpg 904 × 665; 174 KB
-
 Halibut Point 1995.jpg 2,398 × 1,864; 904 KB
-
 Halibut Point Base-End Station 02.jpg 6,000 × 4,000; 11.93 MB
-
 Halibut Point Base-End Station 03.jpg 6,000 × 4,000; 10.85 MB
-
 Halibut Point Base-End Station 04.jpg 6,000 × 4,000; 10.93 MB
-
 Halibut Point Base-End Station 05.jpg 6,000 × 4,000; 11.04 MB
-
 Halibut Point Base-End Station 06.jpg 6,000 × 4,000; 10.28 MB
-
 Halibut Point Base-End Station 13.jpg 6,000 × 4,000; 14.09 MB
-
 Halibut Point Base-End Station 14.jpg 6,000 × 4,000; 11.19 MB
-
 Halibut Point Base-End Station 21.jpg 6,000 × 4,000; 11.42 MB
-
 Halibut Point Base-End Station 24.jpg 6,000 × 4,000; 12.52 MB
-
 Halibut Point Base-End Station 27.jpg 6,000 × 4,000; 14.83 MB
-
 Halibut Point Base-End Station 29.jpg 6,000 × 4,000; 12.1 MB
-
 Halibut Point Base-End Station 30.jpg 6,000 × 4,000; 13.37 MB
-
 Halibut Point Base-End Station 32.jpg 6,000 × 4,000; 10.7 MB
-
 Halibut Point Base-End Station 33.jpg 6,000 × 4,000; 11.81 MB
-
 Halibut Point Base-End Station 43.jpg 6,000 × 4,000; 11.28 MB
-
 Halibut Point Base-End Station 44.jpg 6,000 × 4,000; 12.33 MB
-
 Halibut Point Base-End Station 45.jpg 6,000 × 4,000; 11.51 MB
-
 Halibut Point Base-End Station 46.jpg 6,000 × 4,000; 11.54 MB
-
 Halibut Point FCT 01.jpg 2,992 × 2,000; 4.24 MB
-
 Halibut Point FCT 03.jpg 2,992 × 2,000; 3.88 MB
-
 Halibut Point FCT 04.jpg 2,992 × 2,000; 3.75 MB
-
 Halibut Point FCT 05.jpg 2,992 × 2,000; 4.07 MB
-
 Halibut Point FCT 06.jpg 2,992 × 2,000; 4.17 MB
-
 Halibut Point FCT 07.jpg 2,992 × 2,000; 3.92 MB
-
 Halibut Point FCT 08.jpg 2,992 × 2,000; 4.2 MB
-
 Halibut Point FCT 09.jpg 2,992 × 2,000; 3.72 MB
-
 Halibut Point FCT 10.jpg 2,992 × 2,000; 3.77 MB
-
 Halibut Point FCT 11.jpg 2,992 × 2,000; 3.8 MB
-
 Halibut Point FCT 12.jpg 2,992 × 2,000; 3.95 MB
-
 Halibut Point FCT 13.jpg 2,992 × 2,000; 4.11 MB
-
 Halibut Point FCT 14.jpg 2,992 × 2,000; 4.12 MB
-
 Halibut Point FCT 15.jpg 2,992 × 2,000; 3.96 MB
-
 Halibut Point FCT 16.jpg 2,992 × 2,000; 3.83 MB
-
 Halibut Point FCT 17.jpg 2,992 × 2,000; 4.33 MB
-
 Halibut Point FCT 18.jpg 2,992 × 2,000; 3.91 MB
-
 Halibut Point FCT Construction.jpg 200 × 251; 6 KB
-
 Halibut Point FCT with Radar.jpg 1,436 × 1,043; 208 KB
-
 Halibut Point Radar.jpg 262 × 192; 8 KB
-
 Halibut point radar.jpg 4,912 × 3,264; 3.31 MB


.jpg)


