Fort Levett: Difference between revisions
No edit summary |
J. Malcolm (talk | contribs) reduced some galleries |
||
| (3 intermediate revisions by 2 users not shown) | |||
| Line 5: | Line 5: | ||
File:LevettMap.jpg|alt=|Early 1900s map | File:LevettMap.jpg|alt=|Early 1900s map | ||
File:WhiteheadFCS.jpg|alt=|Whitehead complex | File:WhiteheadFCS.jpg|alt=|Whitehead complex | ||
File:QuadFCS.jpg|alt=|Fort Williams Secondary Station | File:QuadFCS.jpg|alt=|Fort Williams Secondary Station | ||
File:SrchlightPwrhouse.jpg|alt=|Searchlight Powerhouse | File:SrchlightPwrhouse.jpg|alt=|Searchlight Powerhouse | ||
File:Fort Levett21.jpg|alt= | File:Fort Levett21.jpg|alt= | ||
File:Fort Levett20.jpg|alt=|Remaining searchlight tower | File:Fort Levett20.jpg|alt=|Remaining searchlight tower | ||
File:DistSigSta.jpg|alt=|Radio Station | File:DistSigSta.jpg|alt=|Radio Station | ||
File:Fort Levetts 01.jpg|alt= | File:Fort Levetts 01.jpg|alt= | ||
File:Fort Levett4.jpg|alt= | File:Fort Levett4.jpg|alt= | ||
File:LevettCenteralPowerhouse.jpg|alt=|1903 Central Powerhouse | File:LevettCenteralPowerhouse.jpg|alt=|1903 Central Powerhouse | ||
File:Levett (200) 44.jpg|alt=|Shortly after construction. | File:Levett (200) 44.jpg|alt=|Shortly after construction. | ||
File:Centeralpwrhouseinterior.jpg|alt=|Engine Room | File:Centeralpwrhouseinterior.jpg|alt=|Engine Room | ||
File:Levett (200) 33.jpg|alt= | File:Levett (200) 33.jpg|alt= | ||
File:Levett (200) 36.jpg|alt=|Engine Room | File:Levett (200) 36.jpg|alt=|Engine Room | ||
File:Levett (200) 30.jpg|alt=|Utility Pole | File:Levett (200) 30.jpg|alt=|Utility Pole | ||
File:Fort Levett3.jpg|alt=|Training in front of Admin building. | File:Fort Levett3.jpg|alt=|Training in front of Admin building. | ||
File:Levett (200) 32.jpg|alt=|NCO Quarters | File:Levett (200) 32.jpg|alt=|NCO Quarters | ||
File:Levett (200) 31.jpg|alt=|1921 Fire Station | File:Levett (200) 31.jpg|alt=|1921 Fire Station | ||
File:Coal shed remains.jpg|Coal Shed Foundation | |||
File:Levett (200) 28.jpg|alt=|Granite posts for barbed wire behind Battery Kendrick | File:Levett (200) 28.jpg|alt=|Granite posts for barbed wire behind Battery Kendrick | ||
File:Narrow gauge Rail.jpg|Remaining narrow gauge rail. | |||
</gallery> | </gallery> | ||
| Line 39: | Line 31: | ||
File:Fort Levett Batteries.jpg|alt=|1920s aerial image | File:Fort Levett Batteries.jpg|alt=|1920s aerial image | ||
File:Levett (79) 41.jpg|alt=|Rear | File:Levett (79) 41.jpg|alt=|Rear | ||
File:Levett (79) 39.jpg|alt=|Platform extension | File:Levett (79) 39.jpg|alt=|Platform extension | ||
File:Levett (79) 28.jpg|alt=|Emplacement #3 | File:Levett (79) 28.jpg|alt=|Emplacement #3 | ||
| Line 52: | Line 43: | ||
File:Levett (79) 37.jpg|alt=|Shell Room | File:Levett (79) 37.jpg|alt=|Shell Room | ||
File:Levett (79) 36.jpg|alt=|Powder Room with racks | File:Levett (79) 36.jpg|alt=|Powder Room with racks | ||
File:Levett (79) 31.jpg|alt=|BC Station remain (dismantled 1990s) | |||
File:Levett (79) 31.jpg|alt=|BC Station remain (dismantled | |||
File:Fort Levetts 14.jpg|alt=|Plotting Room | File:Fort Levetts 14.jpg|alt=|Plotting Room | ||
File:Levett (79) 40.jpg|alt=|Interior | File:Levett (79) 40.jpg|alt=|Interior | ||
| Line 63: | Line 52: | ||
File:Fort Levett16.jpg|Battery Kendrick Plan | File:Fort Levett16.jpg|Battery Kendrick Plan | ||
File:Fort Levett Batteries.jpg|alt=|1920s aerial image | File:Fort Levett Batteries.jpg|alt=|1920s aerial image | ||
File:Fort Levett14.jpg|alt=|Widely reproduced postcard from the Ottawa Hotel of Battery Kendrick before the platforms were extended. | File:Fort Levett14.jpg|alt=|Widely reproduced postcard from the Ottawa Hotel of Battery Kendrick before the platforms were extended. | ||
File:Levett (79) 49.jpg|alt=|Excavated path to the battery. | File:Levett (79) 49.jpg|alt=|Excavated path to the battery. | ||
File:Levett (79) 50.jpg|alt=|Rear | File:Levett (79) 50.jpg|alt=|Rear | ||
File:Levett (200) 11.jpg|alt=|Emplacement #1 | File:Levett (200) 11.jpg|alt=|Emplacement #1 | ||
File:Levett (200) 09.jpg|alt=|Telephone Booth | File:Levett (200) 09.jpg|alt=|Telephone Booth | ||
| Line 73: | Line 61: | ||
File:Levett (200) 07.jpg|alt=|Stairs to emplacement #1 | File:Levett (200) 07.jpg|alt=|Stairs to emplacement #1 | ||
File:Levett (200) 04.jpg|alt=|Gallery | File:Levett (200) 04.jpg|alt=|Gallery | ||
File:Levett (200) 02.jpg|alt=|Powder Room | File:Levett (200) 02.jpg|alt=|Powder Room | ||
File:Levett (200) 03.jpg|alt=|Shell Hoist location | File:Levett (200) 03.jpg|alt=|Shell Hoist location | ||
File:Levett (200) 29.jpg|alt=|BC Station ruins | File:Levett (200) 29.jpg|alt=|BC Station ruins | ||
</gallery> | </gallery> | ||
| Line 90: | Line 75: | ||
File:Levett (200) 14.jpg|alt=|Emplacement #2 | File:Levett (200) 14.jpg|alt=|Emplacement #2 | ||
File:Levett (200) 15.jpg|alt=|Top of Shell Hoist #2 | File:Levett (200) 15.jpg|alt=|Top of Shell Hoist #2 | ||
File:Levett (200) 21.jpg|alt=|Crows Nest #1 | File:Levett (200) 21.jpg|alt=|Crows Nest #1 | ||
File:Levett (200) 22.jpg|alt=|Shell Room | |||
File:Levett (200) 22.jpg|alt=|Shell Room | |||
File:Levett (200) 23.jpg|alt=|Gallery | File:Levett (200) 23.jpg|alt=|Gallery | ||
File:Levett (200) 26.jpg|alt=|DC motor for shell hoist | File:Levett (200) 26.jpg|alt=|DC motor for shell hoist | ||
File:Levett (200) 20.jpg|alt=|1921 BC Station | File:Levett (200) 20.jpg|alt=|1921 BC Station | ||
File:Levett (200) 17.jpg|alt=|Note telephone boxes on right | File:Levett (200) 17.jpg|alt=|Note telephone boxes on right | ||
</gallery> | </gallery> | ||
| Line 108: | Line 87: | ||
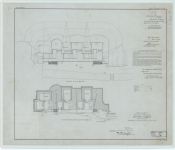
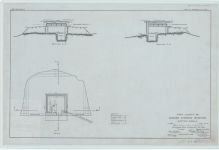
File:Daniels1914plan.jpg|1914 Plan | File:Daniels1914plan.jpg|1914 Plan | ||
File:Battery Daniels BC.jpg|1920 BC Station plan (converted to Mine OP) | File:Battery Daniels BC.jpg|1920 BC Station plan (converted to Mine OP) | ||
File:Levett (79) 42.jpg|Electric pole for nearby searchlight. | File:Levett (79) 42.jpg|Electric pole for nearby searchlight. | ||
</gallery> | </gallery> | ||
| Line 130: | Line 107: | ||
File:Fort Levett28.jpg|alt=|BE-63 Telephone boxes for EE-91s | File:Fort Levett28.jpg|alt=|BE-63 Telephone boxes for EE-91s | ||
File:Fort Levett30.jpg|alt=|#2 Compressor Room | File:Fort Levett30.jpg|alt=|#2 Compressor Room | ||
File:Fort Levett27.jpg|alt=|Emplacement #2 rear entrance | File:Fort Levett27.jpg|alt=|Emplacement #2 rear entrance | ||
File:Fort Levetts 04.jpg|alt=|1943 central entrance | File:Fort Levetts 04.jpg|alt=|1943 central entrance | ||
File:Fort Levett34.jpg|alt=|Latrine | File:Fort Levett34.jpg|alt=|Latrine | ||
File:Fort Levett37.jpg|alt=|Unknown crate | File:Fort Levett37.jpg|alt=|Unknown crate | ||
File:Levett (79) 09.jpg|alt=|Powder and Shell rooms | File:Levett (79) 09.jpg|alt=|Powder and Shell rooms | ||
File:Levett (79) 10.jpg|alt=|Magazine | File:Levett (79) 10.jpg|alt=|Magazine | ||
File:Fort Levett39.jpg|alt=|1943 Generator Room | File:Fort Levett39.jpg|alt=|1943 Generator Room | ||
File:Levett (79) 08.jpg|alt=|1943 BC Station on top of 1921 station | File:Levett (79) 08.jpg|alt=|1943 BC Station on top of 1921 station | ||
</gallery> | </gallery> | ||
| Line 212: | Line 169: | ||
== Present == | == Present == | ||
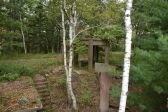
In 1948 all the remaining guns were scrapped, temporary WWII buildings salvaged, and the post was abandoned, | In 1948 all the remaining guns were scrapped, temporary WWII buildings salvaged, and the post was abandoned, along with the narrow-gauge railroad being dismantled. Some of the rails still remain although they are scattered around the side of the path. The remaining rail was found on the spur leading up to the top of Battery Foote. The rail in the dock was kept until the wood was replaced sometime after 1971. The site of the Wagon shed has been turned into a bocce court. The foundation of the coal shed remains right next to it.The army wanted $177,000 for the entire fort and it was purchased in 1957 and became a private housing complex. In 1970 the original barracks building was blown up, and the Sewell FC stations were razed at whitehead. In the 1960s Battery Bowdoin had drill holes made to test the concrete to see if the battery could be used for storing bank records. It never was and no modifications were made. A fire in the late 1970s destroyed most of the large officer's duplex but part of the first floor was salvaged and is now part of a cottage. The hospital was renovated for a residence and the NCO duplexes were converted to single family dwellings. Some of the storehouses and workshops have also been converted to residences but many buildings also remain as storage such as the power plant, stables, mule barn, fire station and pump house. The area with the batteries and FC stations has been designated a nature preserve operated by the islanders but in the past, there were proposals to make it a camp or a science center. Therefore, many of the buildings remain unchanged although heavily weathered with the exception of whitehead, where most of the Sewell structures have collapsed or been removed. Permission is needed to visit the island. | ||
[ | === SOURCES and REFERENCES === | ||
[https://catalog.archives.gov/id/216887826 National Archives Catalog] | |||
[https://web.archive.org/web/20101008080612/http://www.time.com/time/magazine/article/0,9171,826379,00.html Project Science Island] | [https://web.archive.org/web/20101008080612/http://www.time.com/time/magazine/article/0,9171,826379,00.html Project Science Island] | ||
[[wikipedia:Cushing_Island|Cushings Island]] | [[wikipedia:Cushing_Island|Cushings Island]] | ||
[https://cdsg.org Coast Defense Study Group] | |||
[https://www.northamericanforts.com/East/me3.html North American Forts] | [https://www.northamericanforts.com/East/me3.html North American Forts] | ||
Latest revision as of 10:11, 30 January 2026
Loc. 161 Fort Levett was an Endicott era fort built on Cushing's Island in Portland ME. It was used through WWII.
Endicott Era
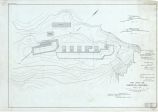
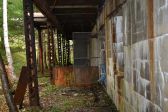
In 1894 the government exercised its right to eminent domain and took control of the land from Francis Cushing to establish a new fort. The initial parcel of land was 33.75 acres which was deemed too small for military use. In 1903 the reservation was increased by 91.68 acres bringing the total to 127 acres. The fort was officially named on April 4th, 1900, after Christopher Levett who explored Casco Bay in the 1620s and was designated a sub post of Fort Williams. No construction on any part of the fort would begin until 1897. Four batteries were planned for the site in 1898. Railroad beds, drains, concrete mixing wells and other necessary infrastructure were prepared for construction and completed by 1899. The concrete work was started in 1900 on Battery Bowdoin and Kendrick. A narrow-gauge railway was completed in 1899 that connected each of the batteries. On November 29th, 1905, 15 main post buildings were accepted for service. The central powerhouse was completed either August 1903 or June 30th, 1905 (the engineer's notebook and QM book have different dates), for $52,600 along the parade ground with three Westinghouse 105 Horsepower steam engines that were purchased in 1903. This powerhouse would provide electricity for all of the tactical buildings at Fort Levett. Two 30-inch truck-mounted searchlights were transferred to Fort Levett on December 26th, 1905. Fort Levett was not garrisoned until 1907 when the 1st Company Coast Artillery Corps (CAC) came to Portland. On January 29th, 1909, a number of buildings were accepted for service including the switchboard building, dormitory, combined secondary station for Fort Williams, Fire Command Positions and Base-End Stations for Batteries Chase, Bowdoin and Kendrick. Secondary Fire Control positions for Fort Levett were located in another stucco building at Fort Williams. On August 26th, 1909, another group of buildings were accepted for service including the district signal station, BC Stations for Batteries Bowdoin and Kendrick, the meteorological station and tide gauge station. In 1911 a brand-new searchlight powerhouse was built near whitehead to serve two 60-inch searchlights transferred April 28th, 1911. Another 60-inch searchlight was located on a concrete platform near Battery Daniels.
-
 Early 1900s map
 -
 Whitehead complex
 -
 Fort Williams Secondary Station
 -
 Searchlight Powerhouse
 -
-
 Remaining searchlight tower
 -
 Radio Station
 -

-

-
 1903 Central Powerhouse
 -
 Shortly after construction.
 -
 Engine Room
 -

-
 Engine Room
 -
 Utility Pole
 -
 Training in front of Admin building.
 -
 NCO Quarters
 -
 1921 Fire Station
 -
 Coal Shed Foundation
 -
 Granite posts for barbed wire behind Battery Kendrick
 -
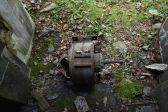
 Remaining narrow gauge rail.


_44.jpg)

_33.jpg)
_36.jpg)
_30.jpg)

_32.jpg)
_31.jpg)

_28.jpg)

Battery Bowdoin
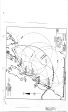
Construction on this three-gun 12-inch disappearing battery started in 1899. Originally planned for four guns, only three emplacements were built. Emplacements #4 and #3 were completed in 1901 and emplacement #2 was completed in 1902. In 1902 it was decided to eliminate the fourth emplacement. Each emplacement was armed with M1897 disappearing carriages and M1895 12-inch rifles which were all installed by 1903. The battery was transferred for use on April 23rd, 1903, at a cost of $190,290.56. This battery was named in 1900 after James Bowdoin who was the governor of Massachusetts in the late 1700s. Bowdoin college in Brunswick is also named for him. Three hodges back delivery hoists were installed originally but on April 15th, 1919, three new Taylor-Raymond back delivery hoists were installed in their place. In 1918 generators were installed to serve the battery and all of whitehead as auxiliary. In 1941 camouflage netting was installed over the battery and would remain in place until deactivation. On March 1st, 1944, Battery Bowdoin's guns were ordered salvaged but were not sent to Watervliet until January 15th, 1945.
-
 Battery Bowdoin Plan
 -
 1920s aerial image
 -
 Rear
Rear -
 Platform extension
 -
 Emplacement #3
 -
 1940s net brackets
 -
 Crows Nest 1-4
 -
 Telephone Booth
 -
 Emergency crane for shells
 -
 Receiving end of a Shell Hoist
 -
 Shot Gallery (Note intact hoist)
 -
 Gallery
 -
 Incomplete Shell Hoist
 -
 Shell Room
 -
 Powder Room with racks
 -
 BC Station remain (dismantled 1990s)
 -
 Plotting Room
 -
 Interior


_41.jpg)
_39.jpg)
_28.jpg)
_26.jpg)
_32.jpg)

_29.jpg)
_25.jpg)
_23.jpg)
_34.jpg)
_35.jpg)
_37.jpg)
_36.jpg)
_31.jpg)

_40.jpg)
Battery Kendrick
Construction on this two-gun 10-inch disappearing gun battery started in 1899 along with Battery Bowdoin. Originally planned to have four emplacements, two were not built in favor of using the space for Battery Ferguson. Construction was mostly completed by 1901, and the battery was armed in 1902 and transferred into service on April 23rd, 1903, with two M1895 10-inch rifles on M1896 disappearing carriages for $118,578.20. This battery was named in honor of Henry Lane Kendrick who was a science professor at West Point. Two Hodges back delivery hoists were provided for transporting shells from the magazines to the gun level. Type-C powder hoists were accepted for service October 14th, 1912. When Battery Ferguson was planned, it was to be adjacent to this battery which resulted in the widening of Battery Kendrick's loading platforms where emplacement #1 met Battery Ferguson. On August 24th, 1917, the two guns were dismounted to be sent abroad. Instead, they just sat at the wharf until the war ended when they were remounted. In 1918 generators were installed to serve Battery Ferguson and Daniels along with the Fire Command group as auxiliary. In 1919 the original Hodges shell hoists were replaced with Taylor Raymond Hoists. Battery Kendrick remained in service until 1932 when it was put in reduced maintenance status essentially eliminating it from the Harbor Defenses. On November 6th, 1942, Battery Kendrick was declared surplus and on December 15th its guns and carriages were ordered salvaged.
-
 Battery Kendrick Plan
 -
1920s aerial image
-
 Widely reproduced postcard from the Ottawa Hotel of Battery Kendrick before the platforms were extended.
 -
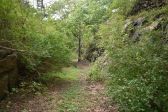 Excavated path to the battery.
 -
 Rear
Rear -
 Emplacement #1
 -
 Telephone Booth
 -
 Top of Shell Hoist
 -
 1912 Powder Hoist hole
 -
 Stairs to emplacement #1
 -
 Gallery
 -
 Powder Room
 -
 Shell Hoist location
 -
 BC Station ruins


_49.jpg)
_50.jpg)
_11.jpg)
_09.jpg)
_10.jpg)

_07.jpg)
_04.jpg)
_02.jpg)
_03.jpg)
_29.jpg)
Battery Ferguson
Plans for this battery were created in 1901. Originally this battery was to hold four 6-inch guns mounted on pedestal mounts but during initial construction in 1902 this plan was altered to only have two guns per emplacement. The battery was named in 1903 after William Ferguson who served in the American Revolution. The battery was completed in 1904. In 1906 M1900 rifles on barbette mounts were installed on the battery, and it was transferred for use on June 22nd, 1906, for $58,500. Two hand cranked Hodges back delivery hoists were provided. In 1921 a new enclosed combined BC and Base-End station was built in the traverse of the battery above a new plotting room (also built 1921). In 1938 Battery Ferguson would be used to protect the minefield of Mines I whose secondary observation station would be built at Battery Daniels in 1942. In 1940 plans to upgrade the battery included extending the existing gun platforms, installing splinter-proof shields on the guns and adding camouflage netting. This would all be completed by 1943. A fire control position would be located at Trundy Point MR to improve the range. The tactical number for Battery Ferguson during WWII was Battery #3. A SCR 296 was also located at Whitehead for the battery. The guns were removed in 1947, and the battery was deactivated.
-
 1901 Plan with four guns
 -
 1905 Plan
 -
1920s aerial image
-
 Firing practice 1943
 -
 1944 Field of Fire
 -
 Emplacement #2
 -
 Top of Shell Hoist #2
 -
 Crows Nest #1
 -
 Shell Room
 -
 Gallery
 -
 DC motor for shell hoist
 -
 1921 BC Station
 -
 Note telephone boxes on right


_14.jpg)
_15.jpg)
_21.jpg)
_22.jpg)
_23.jpg)
_26.jpg)
_20.jpg)
_17.jpg)
Battery Daniels
Construction on this three-gun 3-inch rapid fire battery started in 1899. It was designed to protect and sweep the minefield. The battery was completed in 1900 and armed in 1901 with M1898 masking parapet mounts and M1898 rifles. The battery was transferred April 23rd, 1903, for $14,994.18 after being named for Napoleon Daniels who served in the Civil War. In 1920 a program was started to remove all unnecessary small caliber guns. The guns of Battery Daniels were removed, and the mounts salvaged on March 27th, 1920. Interestingly, a CRF Station was built for the battery, and the plans were accepted July 9th months after the guns were removed. This station would be renovated in 1942 for the Mine OP. The battery is so overgrown that it is essentially buried making it nearly impossible to access the rooms and even emplacements so unfortunately, I was unable to get many photos.
-
 1914 Plan
 -
 1920 BC Station plan (converted to Mine OP)
 -
 Electric pole for nearby searchlight.


_42.jpg)
World War One and Interwar
In 1914 the 50th Company CAC was moved from Fort McKinley to Levett. In 1917 the 9th, 22nd and 23rd companies of the Coast Defenses of Portland were assigned to Fort Levett. Maine National Guard CAC would be stationed at the fort in the 1920s. In 1915 a mortar battery was proposed to be built. It is not known whether its location was decided, but no construction ever began. Plans for a new post telephone switchboard were approved April 9th, 1918. This new design would provide all around protection for the building which before was located in a flimsy Sewell building at whitehead. This new switchboard building was accepted for service in 1921. In 1920 an Anti-Aircraft Battery of two 3-inch guns was built. In 1932 a third gun was added to the Anti-Aircraft Battery along with .50 Anti Air Machine Guns and a 60-inch AA Sperry Searchlight.
-
 Post Map
 -
 Protected Switchboard


Battery Foote
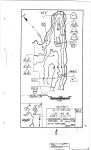
Construction was authorized in 1917 for a new long range 12-inch gun battery. Initially, two batteries were planned for the site, but the second was eliminated before construction could begin. The estimated cost for the battery was $149,415 which included the carriages but $236,000 was allotted. It would cost another $10,000 to install the guns which were model M1895A4 on M1917A2 Long range barbette carriages. The weapons were installed and ready for action on December 17th, 1920. The arc of range was originally about 17 miles in all directions. This battery was completed January 26th, 1921, and named in honor of Stephen M Foote who was in the CAC. The two gun emplacements were 320 feet apart with a central magazine in the middle. A power room was built in the middle of the central magazine. Two fire control positions with open roofs could be accessed via two staircases along the central traverse. In 1922 property was acquired on Jewell Island MR and Trundy Point MR for fire control stations. A steel tower would be built at Trundy Point and a one room concrete building would be built on Jewell Island which would be replaced in the 1930s by a castle-like station. In the 1940 modernization plan, Battery Foote was selected to be casemented for protection against air and gas attack. This upgrade would be completed in July 1943 and additional fire control positions would be added for increased range. WWII Fire Control Stations for Battery Foote would be located at Fletchers Neck MR, Prout's Neck MR, Trundy Point MR, Jewell Island MR and Bailey Island MR. A SCR 296 would be located at Dyer Point in Cape Elizabeth MR for the battery. The WWII tactical number for Battery Foote was Battery #4. Four mobile Anti-Aircraft Machine guns were located on and around the battery.
-
 Two proposed locations for the battery.
 -
 Plan
Plan -
 1920s aerial image
 -
 1930s
1930s -
 1944 Field of Fire
 -
 Front of emplacement
 -
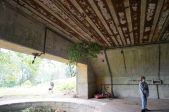 Emplacement #1
 -
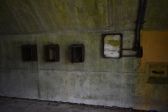 BE-63 Telephone boxes for EE-91s
 -
 #2 Compressor Room
 -
 Emplacement #2 rear entrance
 -
 1943 central entrance
 -
 Latrine
 -
 Unknown crate
 -
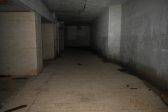 Powder and Shell rooms
 -
 Magazine
 -
 1943 Generator Room
 -
 1943 BC Station on top of 1921 station


_09.jpg)
_10.jpg)

_08.jpg)
World War Two
On September 16th, 1940, Fort Levett was manned by the 1st Battalion 240th Coast Artillery under Colonel George Fogg Sr. Battery A would service Battery Foote, Battery B would service Battery Bowdoin and Battery C would service Battery Ferguson, Battery G would service the AA guns. The existing 28 post buildings were noted to be in poor condition by June 1940, and a building boom would start at the fort adding 26 temporary buildings and renovating the existing ones. In a June 1941 report all new post construction was complete, and the number of enlisted men was 758 (it had been 124 in 1939). $65,412 was spent on repairing the existing buildings. The new construction would include 10 barracks, four mess halls and various assorted support buildings. By the end of WWII, Fort Levett had 55 buildings. Upgrades would be made to Batteries Bowdoin and Ferguson to improve them for war. Test firings were completed in 1941. Additional construction would take place on Fire Control Structures and Battery Foote from 1942-44. The AA Battery would be designated AA Battery #3, and a mobile SCR-584 would be located at the fort for Anti-Aircraft tracking.
-
 1944 Post Map
 -
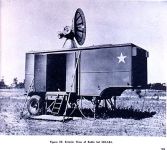 SCR-584 for AA guns. Similar to what would have been at Levett.
 -
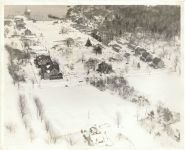 1941 Aerial
_45.jpg)
_46.jpg)

WWII FIRE CONTROL STATIONS & RADARS
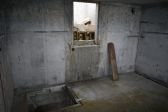
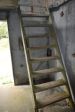
Site 1B Mine Observation Station
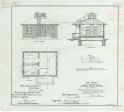
In 1942 the vacant Battery Daniels CRF station was selected to be converted into the Mines I secondary observation station. The CRF station which had been built in 1920, contained one level and a small manhole under the building. A second story was added, and the lower level was renovated. Two DPF pads would be installed along with new communications equipment. One oddity in this station is the use of a staple ladder to access the second floor rather than the traditional wood ladder used in all the other FC stations on the post.
-
 Front
Front -
 Staple Ladder
 -
 Top Floor
 -
 DPF on top floor
_48.jpg)
_45.jpg)
_47.jpg)
_46.jpg)
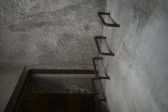
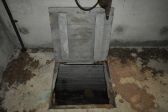
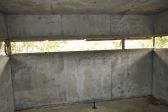
Site 1E Fire Control Tower
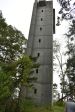
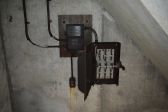
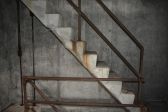
This 8-story tower was built in 1942 and served (all DPF) Battery Foote on the 8th floor, Battery 201 at Cape Elizabeth MR on the 7th floor and Battery Ferguson on the 6th floor. The trees that have grown around the tower have acted as a barrier against the weather which in turn has allowed many original windows to survive, some still even function! This tower was disguised with haze paint that would make it blend in with the horizon.
-
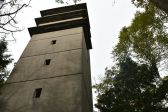 Front
Front -
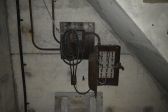 Electric Panels
 -
 Manhole
 -
 Intact trapdoor
 -
 Intact windows
_15.jpg)
_16.jpg)
_17.jpg)
_18.jpg)
_19.jpg)
Site 1G SCR 296-3 (Radar)
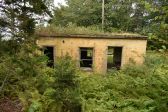
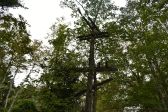
Built in 1943 atop a 100ft steel girder tower this radar served Battery Ferguson. A concrete block operation building, and generator buildings (25kw generators) were located at the base of the tower. In 1948 the radar and tower were removed for scrap. The concrete block operations building remains, although the roof is missing. Of the two generator buildings neither were found upon quick inspection.
-
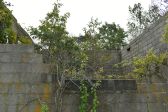 Operations Building
 -
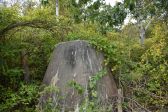 Tower Footer
_41.jpg)
_42.jpg)
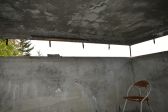
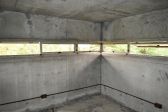
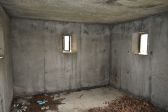
Site 1H Fire Control Tower
This 8-story tower was built in 1942 and served (all DPF) Battery 202 at Jewell Island MR on the 8th floor, Battery Carpenter at Fort McKinley on the 7th floor and Gun-Group Five (G-5) on the 6th floor which comprised of the AMTB batteries 961 at Fort Williams, 962 at Fort Levett, 963 at Peaks Island MR, Battery Mason at Fort Preble and Battery Keyes at Fort Williams. A unique Anti-Aircraft crow's nest was built on the top floor of the tower hanging off the back instead of being concealed within the structure.
-
 Rear
Rear -
 Electric Panels
 -
 Concrete stairs
 -
 One of three observation levels
 -
 Anti-Aircraft Crows Nest access


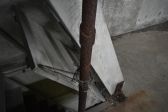
Site 1J Gun-Group Command Post
This station was built in 1942 and was the gun-group one combined observation post and command post. Gun-Group 1 was comprised of the primary batteries at Fort Levett (Foote and Ferguson). This Groupement would switch around over the course of the war depending on what batteries were active at which forts. From January 1944 to 1945 G-1 consisted of Battery Foote and Steele.
-

-
 Group Station
 -
 Ladder
 -
 DPF mount with bolts drilled off

_40.jpg)
_39.jpg)
_38.jpg)
Battery AMTB 962
AMTB #2 was constructed in 1942 and built 40ft above sea level. It covered the interior of the main shipping channel. Ammunition and powder were stored in the defunct Battery Daniels and the wooden BC Station was built inside one of the emplacements where it remained until 1987 when it was blown over. Two fixed 90mm guns were mounted on concrete pads and two mobile 37mm guns were located on wooden platforms near the fixed emplacements. This battery was deactivated in 1946, but its guns may have been stored away earlier. The gun blocks are hard to access due to overgrowth and Battery Daniels where the BC station and ammo storage was, is effectively buried in overgrowth.
_47.png)
Present
In 1948 all the remaining guns were scrapped, temporary WWII buildings salvaged, and the post was abandoned, along with the narrow-gauge railroad being dismantled. Some of the rails still remain although they are scattered around the side of the path. The remaining rail was found on the spur leading up to the top of Battery Foote. The rail in the dock was kept until the wood was replaced sometime after 1971. The site of the Wagon shed has been turned into a bocce court. The foundation of the coal shed remains right next to it.The army wanted $177,000 for the entire fort and it was purchased in 1957 and became a private housing complex. In 1970 the original barracks building was blown up, and the Sewell FC stations were razed at whitehead. In the 1960s Battery Bowdoin had drill holes made to test the concrete to see if the battery could be used for storing bank records. It never was and no modifications were made. A fire in the late 1970s destroyed most of the large officer's duplex but part of the first floor was salvaged and is now part of a cottage. The hospital was renovated for a residence and the NCO duplexes were converted to single family dwellings. Some of the storehouses and workshops have also been converted to residences but many buildings also remain as storage such as the power plant, stables, mule barn, fire station and pump house. The area with the batteries and FC stations has been designated a nature preserve operated by the islanders but in the past, there were proposals to make it a camp or a science center. Therefore, many of the buildings remain unchanged although heavily weathered with the exception of whitehead, where most of the Sewell structures have collapsed or been removed. Permission is needed to visit the island.